Whirlpool Galaxy M51 imaged with an 8 inch SCT at 1140 mm focal length, an ASI 533MC astronomy camera with UV-IR filter, DIY reducer, and tracked with a restored Meade LXD75 mount. M51 is relatively bright and may be visible through a small telescope. Use the stars of the Big Dipper to find M51.
M51, 2 hours exposure
For a complete list of astrophoto images, click here.
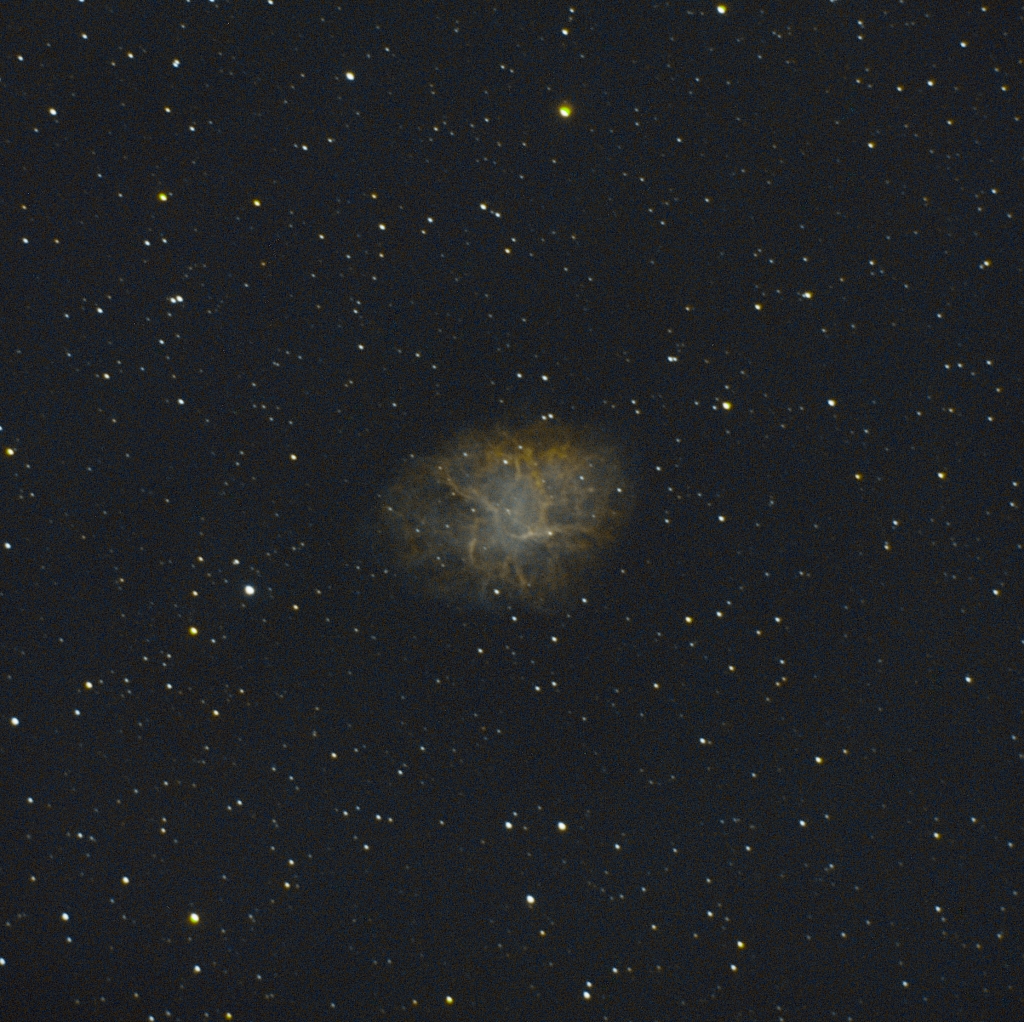
To find the Crab Nebula, locate Auriga first and then scan the region south of Auriga, near the bright star in Taurus. A narrowband filter helps in increasing the contrast between the nebula and the sky (such as using a 12 nm OIII for visual use, or 6 nm dual-band OIII and H-alpha for photography). Due to the nebula’s small angular size, a telescope with 4 inch aperture or larger with relatively long focal length is recommended for this target.
Crab Nebula M1, unguided image with an 8 inch SCT at 1140 mm focal length on a DIY reducer, an ASI533MC cooled astronomy camera, dual-band H-alpha and O-III filter, and a Meade LXD75 mount.
Crab Nebula, 1140 mm, 1 hour unguided exposure
For a complete list of astrophoto images, click here.
This a test image of Jupiter using a Celestron 8 inch SCT on a Meade LXD75 tracking mount. This is a stack of 1500 frames imaged with an ASI 533 camera and a UV-IR filter through 4x Barlow lens. Sharpcap was used in recording RGB24 AVI file. Stacking done with AutoStakkert and wavelets adjustment in SIRIL.
I have installed a dovetail clamp to my Vixen Super Polaris mount. This modification allows easier swapping between mounts and telescopes, since my two other telescope mounts (Meade LXD75 and Vixen Great Polaris) both have Vixen-style dovetail clamps.
Dovetail clamp
I removed the bar that the telescope’s saddle originally attaches to then drilled and tapped holes to fasten the dovetail clamp to the mount with screws. This clamp will be carrying a very light payload, just a 114 mm Newtonian reflector for visual use.
Rosette Nebula imaged with a Sky-Watcher 100ED with a DIY focal reducer, ASI 533MC cooled astronomy camera, dual band H-alpha and O-III filter. Guided tracking using an ASI 174MM with 50 mm f/4 guide scope and a Meade LXD75 mount.
Rosette Nebula, 1 hour exposure
For a complete list of astrophoto images, click here.
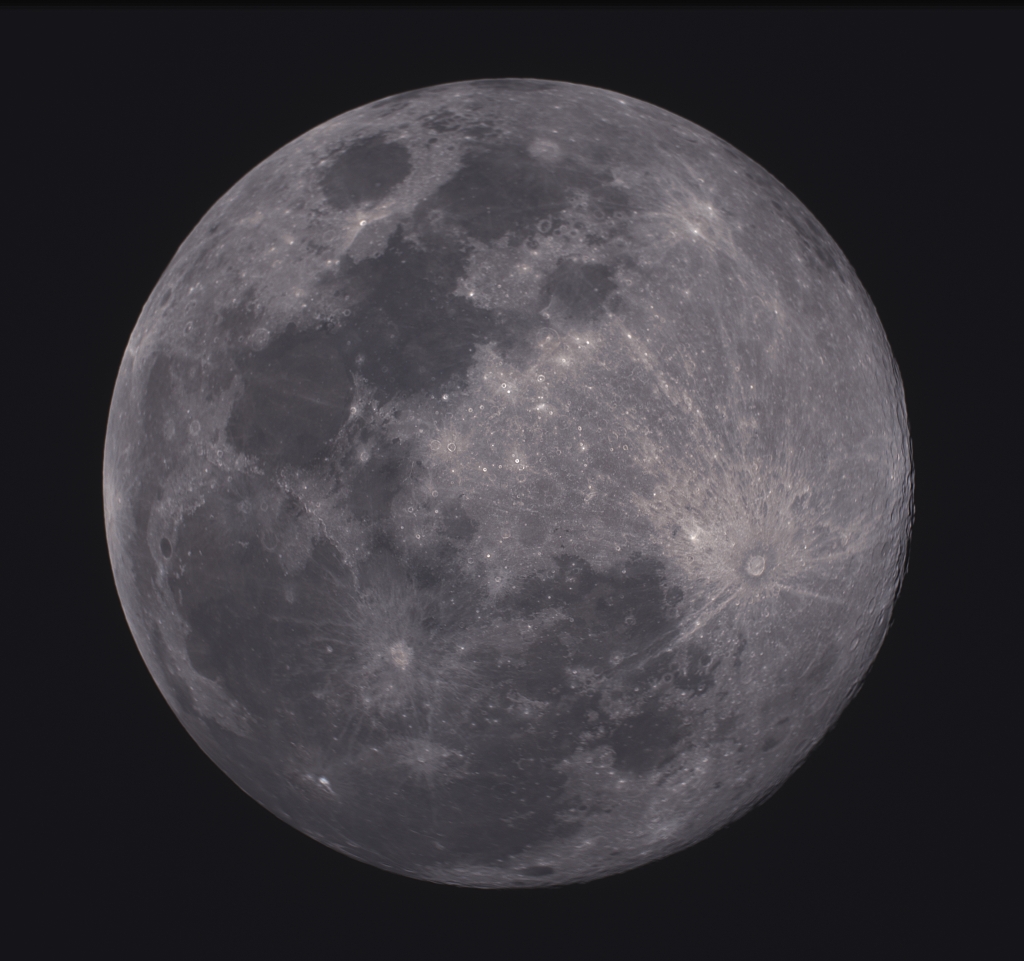
Earthshine can be best observed when the moon is in crescent phase. The moon’s darker surface becomes visible as it gets illuminated by sunlight reflected off the Earth. This photo is a stack of 25 images at 15 seconds each, imaged with a Sky-Watcher Equinox 100ED and an ASI 533MC astronomy camera on a Meade LXD75 tracking mount.
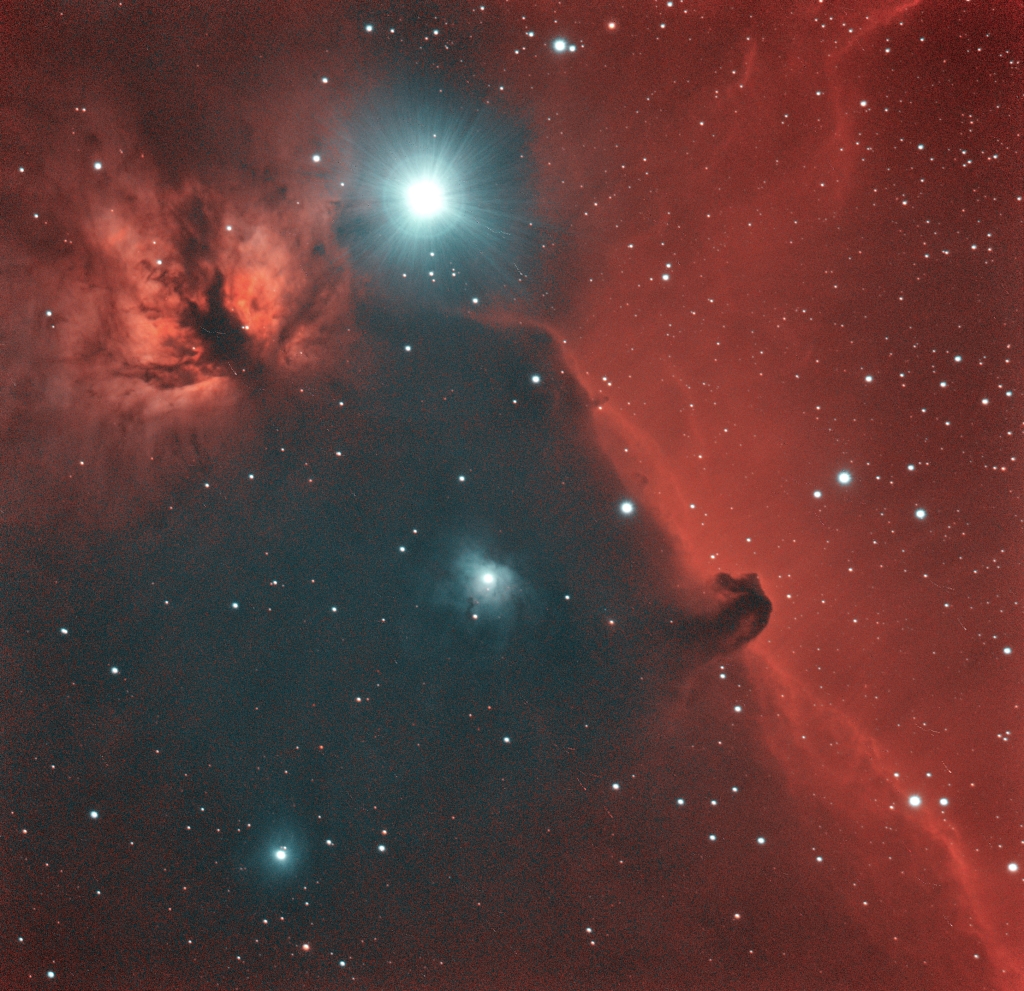
Flame and Horsehead Nebula in the constellation Orion imaged with a Sky-Watcher Equinox 100ED refractor at 608 mm focal length on DIY reducer, an ASI 533MC cooled astronomy camera, a dual band H-alpha and O-III filter, and an ASI 174MM guide camera. Tracking was done using a Meade LXD75 mount with DIY controller.
Flame and Horsehead Nebula M8, 4 hours exposure
For a complete list of astrophoto images, click here.
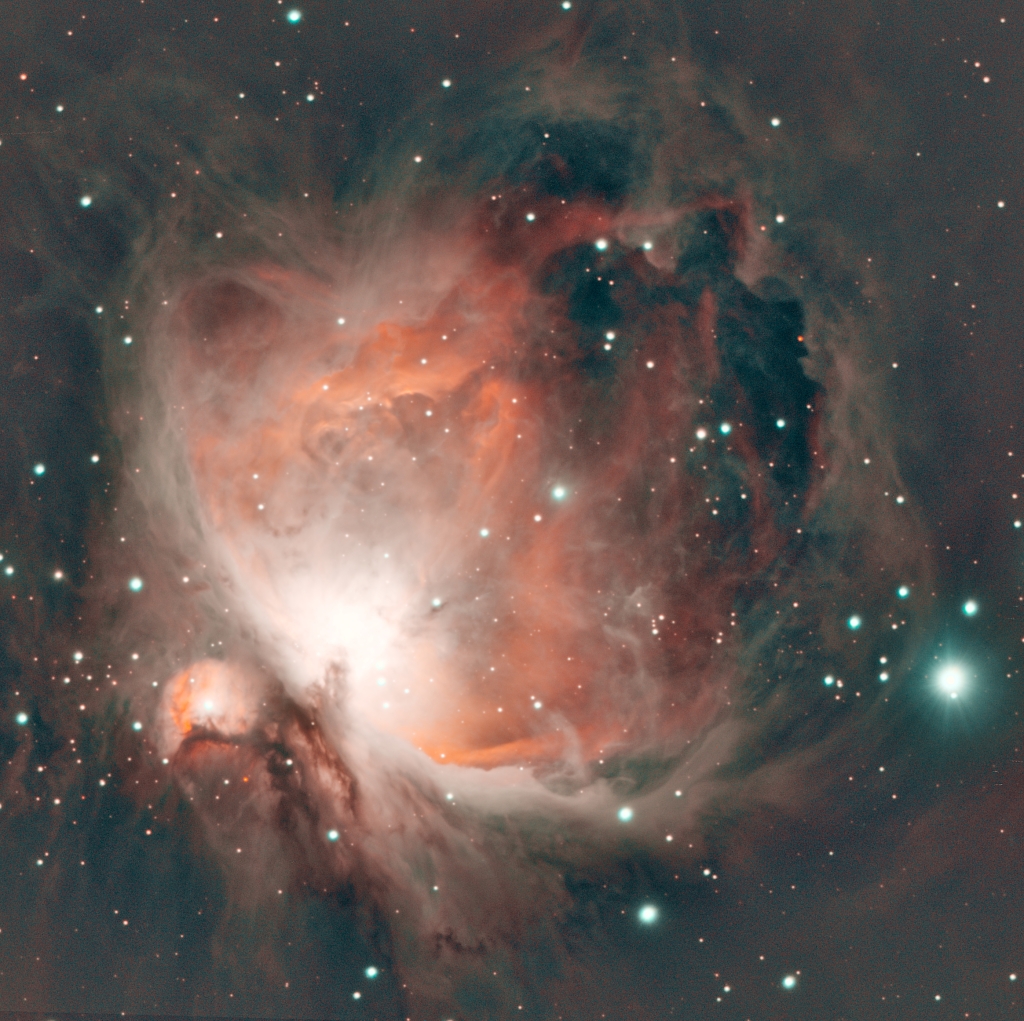
Orion Nebula M42 imaged with a 4 in refractor at 608 mm focal length, an ASI 533MC cooled astronomy camera, dual band H-alpha and O-III filter, with an ASI 174MM guide camera. This is a test image taken with a DIY focal length reducer.
Orion Nebula M42, 7 hours exposure
For a complete list of astrophoto images, click here.
Helix Nebula imaged with a modified Sky-Watcher Equinox 100ED, ZWO duo nebula filter, and an ASI 533 astronomy camera at 608 mm focal length using a 0.67x DIY focal reducer, guided with a 50 mm guide scope and an ASI 174MM guide camera.
Helix Nebula imaged with 100 mm aperture at f/6, with DIY 0.67x focal reducer, 2 hours exposure
For a complete list of astrophoto images, click here.
I have recently acquired a Meade LXD75 mount without a polar scope. I noticed that a small finder scope could fit in the polar scope slot, thus, serve as an improvised polar scope.
DIY polar scope using a repurposed finder scope
I looked for a small finder scope and it so happened that an 8 x 20 Celestron finder fits the slot. I have made some modification in the finder scope’s barrel to make sure it clears the polar scope slot. Notice that the finder scope’s barrel has been modified, with a smaller barrel diameter towards the objective lens, otherwise it would not fit all the way through and protrude too much.
A repurposed 8 x 20 Celestron finder scope used as a polar scope
I tested the improvised polar scope on a clear night to see if I would be able to spot Polaris and roughly polar-align the telescope. While it lacks a star map overlay, a usual feature in a standard polar scope, it has a cross hair for tracking the position of Polaris relative to the position of the mount’s RA axis. An app such as the Stargate PA can be used to determine Polaris’s position relative to the cross hair, for more precise alignment.
Polaris as seen through a DIY polar scope. To see an overlay showing the north celestial pole, click here.
A polar scope can only help in rough polar alignment, perhaps good enough for visual astronomy. For astrophotography, a more accurate polar alignment method is needed such as the drift alignment method. In drift alignment method, when the telescope is pointed and tracking a star in the east, minimize the north-south drift in the eyepiece by adjusting the polar axis higher or lower (altitude adjustment). When the telescope is pointed and tracking a star in the celestial equator (near meridian), minimize the north-south drift by adjusting the polar axis to the left or to the right (azimuth adjustment).
I have also installed a Kenko polar scope to a Vixen Great Polaris (GP) mount. I modified the polar scope’s coupler to fit the Vixen GP mount. Instead of the standard threaded coupling, I used three screws to attach the polar scope onto the mount. A separate set of centering screws allow alignment of the star map overlay with that of the actual stars in the sky.
Kenko polar scope attached to a Vixen Great Polaris (GP) mount
A polar scope is helpful in aligning the mount’s polar axis with that of the Earth’s axis of rotation, but it lacks the precision required for astrophotography. When imaging at longer focal lengths, I recommend not relying on a polar scope, but instead use the declination drift alignment method for polar alignment. It looks at two stars, one in the eastern or western horizon, and another in the meridian near the celestial equator, allowing for better polar alignment even without the view of Polaris.
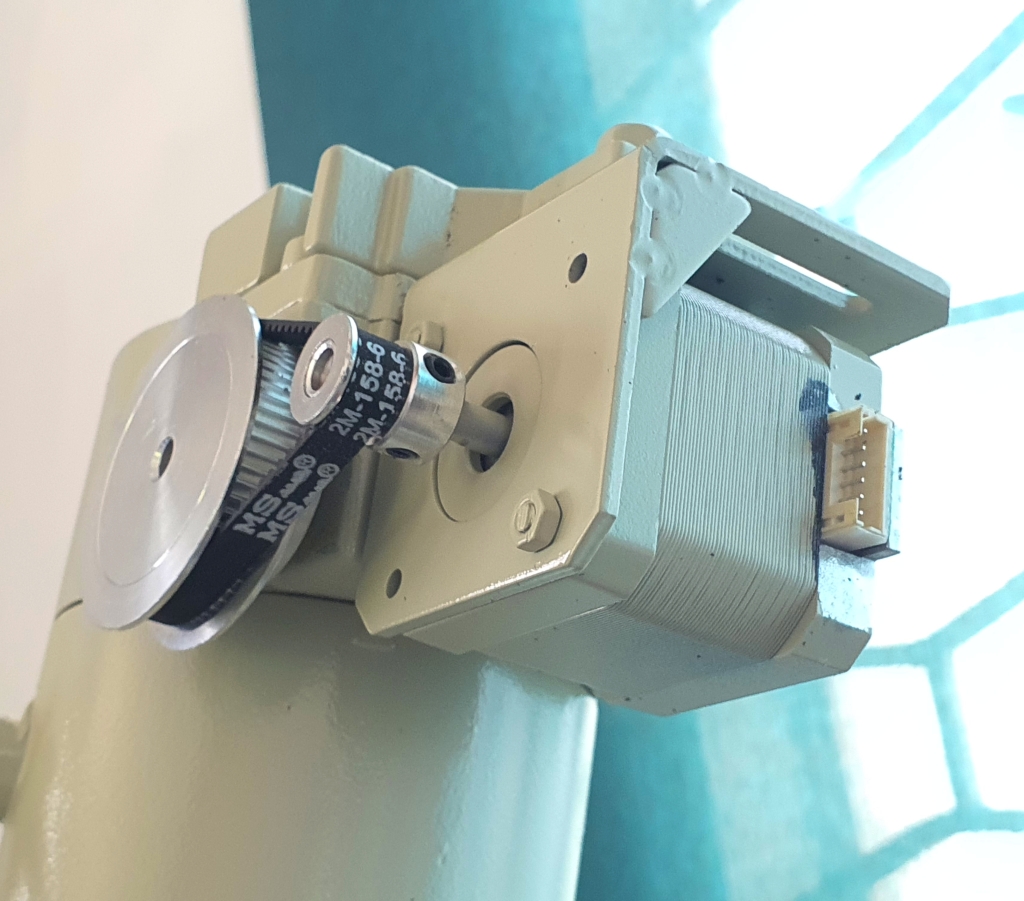
The original controller of this Meade LXD75 mount has failed and a DIY OnStep controller was used to repair the mount and restore its tracking and go-to capability. I have installed RA and declination motors and used an Arduino microcontroller to control the motors. Just like the mounts typical of this class and era, it has a 144:1 main shaft gear reduction, and looks very similar to the Vixen Great Polaris mount. It takes 144 full rotations of the worm to rotate the RA or declination shaft 360 degrees.
I used NEMA 17 stepper motors on an L-brackets with 16-teeth and 60-teeth pulley and belt drive system for each axis. The total steps are 200 steps * 60/16 reduction * 144/1 teeth worm drive with 1/64 micro-stepping, at 6, 912, 000 per 360 degrees, or 19,200 per degree.
The mount uses an Arduino Mega 2560 as the main controller board, a pair of LV8729 stepper motor driver, and an HC-05 Bluetooth module (which connects to the OnStep Android app). It is powered by a 12V 12A power supply. To watch a video of this Meade LDX75 OnStep conversion during testing, click here.
I’ve recently acquired a Vixen Super Polaris mount, which now serves as the dedicated tracking mount for my Vixen R114 Newtonian Reflector. The mount is a motorized star tracker using a unipolar stepper motor and gear system, controlled with a DMD-1 hand controller. The controller does not have an autoguider port, but a DIY guide port can be made if needed. Aside from the RA axis motor port, it has another port for the declination axis motor, but the motor attachment is not included with this mount. The mount has a polar scope which may be useful when aligning the telescope with Earth’s polar axis.
Paired with my Vixen R114 reflector, they serve as my main telescope and mount setup for outreach events. The mount can be carried on a separate hard case while the optical tube assembly together with the tripod can by carried on another hard case.
The supplied counterweight is just enough to balance a 114 mm reflector. Additional counterweight is required for astrophotography use. Other features include adjustment screws for latitude and azimuth adjustment for precise polar alignment.
Vixen Super Polaris mount with a Vixen R114 reflecting telescope
I attached a binocular eyepiece (or binoviewer) repurposed from an old microscope to a reflecting telescope. A beam splitter prism splits the light and send it to two eyepieces. The image viewed on each eyepiece will be less bright (half brightness), but since both eyes see the image, the view appears to have an enhanced perception of depth.
A repurposed microscope binoviewer used with a Newtonian reflector
One of the main advantages of using binoviewers is the enhanced viewing experience particularly in viewing the moon, or the planets. The image appears to be very immersive.
6 mm eyepieces mounted on a binoviewer repurposed from a microscope. The rack and pinion focuser has been removed. Focusing is done using the helical focuser on each eyepiece.
Leo Triplet (M65, M66, NGC3628), three bright galaxies in the vicinity of Leo imaged with a 4 in refractor at 628 mm focal length, an ASI 533MC cooled astronomy camera, with an ASI 174MM guide camera. The trio galaxies are bright and visible with small telescopes in relatively dark skies. Two bright stars in Leo can be used to easily find this galaxy group. Imaged from a recreation site in Caliraya, Quezon, in March 2023.
Leo Triplet Galaxies, 1 hour exposure
For a complete list of astrophoto images, click here.
I’ve built a simple binocular parallelogram mount for my 10×50 binoculars, to provide precise and smooth motion during extended visual observations. A repurposed desktop lamp mount was sturdy enough to support the weight of a small binoculars. It can be moved around freely yet remain in place when pointed at a specific part of the sky.
The parallelogram mount attaches to a Vixen altitude-azimuth mount. It allows coarse and fine adjustments through the motion control knobs. The DIY mount connects directly to a standard binocular mount. It uses springs to provide balance instead of a counterweight, with short parallelogram bars and tighter fastening screws for better stability.
I’ve tested the parallelogram mount for lunar observations and for scanning the Milky Way. With this DIY mount, the binoculars can be pointed at any target from horizon to zenith with comfort and ease, eliminating the strain on the hand and unsteadiness associated with unmounted binoculars.
Omega Centauri (NGC 5139) imaged with a Sky-Watcher Equinox 100ED with DIY focal reducer (at 100 mm f/6.2), an ASI 533MC astronomy camera, and an ASI 174 mm off-axis guider. This target was imaged from a recreation site near lake Caliraya, Quezon, in March 2023.
Omega Centauri, 2.8 hours exposure
For a complete list of astrophoto images, click here.
Lagoon Nebula M8 imaged with a 4 in refractor at 628 mm focal length, an ASI 533MC cooled astronomy camera, dual band H-alpha and O-III filter, with an ASI 174MM guide camera. This is a test image taken with a DIY focal length reducer.
Lagoon Nebula M8, 2 hours exposure
For a complete list of astrophoto images, click here.
C/2022 E3 (ZTF) imaged in January 24, 2023 from Bacoor, Cavite, using a Sky-Watcher 100ED with a DIY focal reducer, ASI 533MC cooled astronomy camera, a UV-IR filter, and a motorized Vixen Grand Polaris mount. I have observed this comet to be at about the same surface brightness and apparent angular size with the M51 galaxy. It is barely detectable visually using a 10 by 50 binoculars or 8 by 50 finder scope.
C/2022 E3 (ZTF), stack of 3 images at 180 sec each